
UK Zip Build
Moderator: ttownshaw
Re: UK Zip Build
I'm with Tom, if it were me I would use a multi tool to cut all of the epoxy fillets loose around the joint, then plunge cut beside the stem through frame 5 1/2 with a little jiggling i bet it will come off pretty clean, plenty close for some thickened epoxy on the reattach, i would bet the stem and breasthook are totally salvageable! It seems worse than it actually is i promise!
I cut twice and it's still too short 

Re: UK Zip Build
Tom, Joshua, thanks for the suggestion. I suppose I have little to lose trying this - as long as I ensure that any cuts I make don't damage the frame itself I keep my options open to either re-use the stem or not. But the stem is at least 10 degrees away from where it should be which means the breasthook is too (firmly epoxied to the stem). Yes, I can build it up to make it level in the new position but practical considerations aside I need to decide whether I can live with such a bodge at this early stage of the build. It won't be visible on the finished boat but I'll know about it and I don't think I will be comfortable knowing about it.
When it comes down to it, making a new stem and breasthook isn't such a big deal and I know that a second attempt would allow a more elegant solution to my design changes than the first attempt. Having slept on the problem it doesn't feel so bad whatever happens.
When it comes down to it, making a new stem and breasthook isn't such a big deal and I know that a second attempt would allow a more elegant solution to my design changes than the first attempt. Having slept on the problem it doesn't feel so bad whatever happens.
-
BarnacleMike

- Posts: 1266
- Joined: Wed Sep 21, 2011 7:47 am
- Location: North Georgia / Chattanooga Area
- Contact:
Re: UK Zip Build
I believe what Joshua is suggesting will give you the most options for salvaging as much as possible. With a multi-tool, you could cut through the 3 joints where the stem connects to Frame 5-1/2 (port, starboard, and topside).
This would probably leave you with a little bit of repair / shimming to do in the resulting notch, but it shouldn't be bad. This would let you leave the frame in place, without having to rebuild it. It would also leave your stem intact to reposition & re-use. Upon re-attachment, you could add some substantial blocking that should more than offset any reduced strength in the joint.
I can't quite picture what you mean by the stem being at least 10 degrees off.... Is it rotated so that the centerline is off?
True, making a new stem & breasthook isn't such a big deal. Certainly not at this point. But, if the piece is solidly built and functional, I'd at least consider reusing it and moving forward. The way I look at it is: something else like this will probably happen again, further into the build. If you rebuilt the parts every time, it will greatly add to your overall construction time.
I'm looking forward to seeing how you address the stem issue. In the long run, this is really just a minor bump in the road.
Completed Builds:
Glen-L Utility, "Perseverance"
(2) MBW Hiwassee Wanderer canoes
Abandoned Builds: Glen-L Squirt, Glen-L Zip
Currently Building: Jim Michalak AF-4
Glen-L Utility, "Perseverance"
(2) MBW Hiwassee Wanderer canoes
Abandoned Builds: Glen-L Squirt, Glen-L Zip
Currently Building: Jim Michalak AF-4
Re: UK Zip Build
No, it's aligned correctly with the centreline. I mean by having the breasthook too high (with the boat upside down) it has rotated the stem by 10 degrees or so around its junction with frame 5 1/2. By correcting this, if I could cut cleanly through the joints, I will then end up with a breasthook that's the same 10 degrees off horizontal when the stem is in the correct place. In other words, the stem is off by 10 degrees at both ends, relative to the breasthook and the frame. Both ends would need to be corrected.BarnacleMike wrote:I can't quite picture what you mean by the stem being at least 10 degrees off.... Is it rotated so that the centerline is off?
Re: UK Zip Build
Well I slept on it another night and decided there were too many things that I'd like to change about the stem and (in particular) breasthook to be able to accept additional bodges. So I performed a 'stemectomy' today:

With some careful cutting it came away fairly cleanly as far as the frame is concerned - it just needs a bit of cleaning up and then it's time to start again with the Mk 2 versions.
With some careful cutting it came away fairly cleanly as far as the frame is concerned - it just needs a bit of cleaning up and then it's time to start again with the Mk 2 versions.
-
BarnacleMike
- Posts: 1266
- Joined: Wed Sep 21, 2011 7:47 am
- Location: North Georgia / Chattanooga Area
- Contact:
Re: UK Zip Build
And a fine-looking stemectomy it is, sir!
Completed Builds:
Glen-L Utility, "Perseverance"
(2) MBW Hiwassee Wanderer canoes
Abandoned Builds: Glen-L Squirt, Glen-L Zip
Currently Building: Jim Michalak AF-4
Glen-L Utility, "Perseverance"
(2) MBW Hiwassee Wanderer canoes
Abandoned Builds: Glen-L Squirt, Glen-L Zip
Currently Building: Jim Michalak AF-4
Re: UK Zip Build
New stem and breasthook fitted. I nearly made the same mistake as the first time with the height of the blocking - I've raised the sheer by an inch (forward) so I raised the blocking an inch to compensate.......except I should have dropped it an inch instead. I wasn't thinking upside down. So the original breasthook was 2" out from where it should have been. Anyway, I'm much happier with the new version so all is good.

I've also completed the keel. I laminated the oak with 1/4" ply (strange that the build instructions say to do this after flipping the boat - much harder that way!) but it wasn't completely flat. I didn't feel comfortable attaching it to the frames without being able to satisfy myself that it was completely level so I stiffened/straightened it with oak webs. It adds some weight but it makes for an extremely solid assembly that is completely true and the stiffening members will act as central floor supports

I epoxied this assembly in place last night - screwed to the frames but only glued and clamped to the stem as I'm still waiting for delivery of shorter SB bolts. The 6" ones specified in the bill of materials are way too long and because they're not threaded along their whole length I can't cut them down to the length I need. And I don't have the right die to cut the threads further down. Not a big deal except that they're expensive and I'm now held up waiting for them. Poor forward planning.
The keel and knee aren't attached to the transom yet - I decided to do that as a separate exercise as it would be easier to get the transom alignment spot on.
I've also completed the keel. I laminated the oak with 1/4" ply (strange that the build instructions say to do this after flipping the boat - much harder that way!) but it wasn't completely flat. I didn't feel comfortable attaching it to the frames without being able to satisfy myself that it was completely level so I stiffened/straightened it with oak webs. It adds some weight but it makes for an extremely solid assembly that is completely true and the stiffening members will act as central floor supports
I epoxied this assembly in place last night - screwed to the frames but only glued and clamped to the stem as I'm still waiting for delivery of shorter SB bolts. The 6" ones specified in the bill of materials are way too long and because they're not threaded along their whole length I can't cut them down to the length I need. And I don't have the right die to cut the threads further down. Not a big deal except that they're expensive and I'm now held up waiting for them. Poor forward planning.
The keel and knee aren't attached to the transom yet - I decided to do that as a separate exercise as it would be easier to get the transom alignment spot on.
Re: UK Zip Build
Great recovery on the stem. It's easy to get confused when building upside down, that whole "up is down" "port is starboard" thing...I'm interested to see how the raised sheer looks. And the keel is a straight line on the Zip? For most of the Glen L planning hulls the keels are straight/flat for the rear-most third of the hull and then curve upward (or downward if it's upside down  ) toward the bow. I hope the keel stiffeners you installed don't interfere with that.
Murphy's Law: Anything that can go wrong, will go wrong.
Griffin's Law: Murphy was an optimist.
Griffin's Law: Murphy was an optimist.
Re: UK Zip Build
The sheerline will be raised 3" in total but the sheer timber itself is raised only 1" at the bow, progressing to 3" up at the transom. The additional 2" at the bow will be achieved with a 2" thick cover board edge (not the entire cover board) which will taper down towards the transom in a similar way to a Barrelback. A 3" rise at the transom allows me to run a long-shaft motor.
On a Zip the keel is flat from frame 4 to the transom. The stiffeners I've fitted run between the transom knee and frame 2 and between frame 2 and frame 4. The curve towards the stem is entirely forward of frame 4 and this part is not stiffened for that reason.
My keel bolts turned up in the post this morning so I've now been able to cut them precisely to length and bolt the keel in place properly at both ends. Just the transom to attach to the knee and then I can move onto the chines.
Re: UK Zip Build
OK, great with the keel. I may borrow your idea for my Malahini... I have seen often enough where builders have had to add filler on low spots in their bottom planking. Those low spots are usually between frames. I may install stiffeners similar to yours to the bottom battens between the frames to keep the low spots from forming.
Have fun and post photos!
Have fun and post photos!
Murphy's Law: Anything that can go wrong, will go wrong.
Griffin's Law: Murphy was an optimist.
Griffin's Law: Murphy was an optimist.
Re: UK Zip Build
I've been making some progress recently. Keel and chines fitted:

And now the reason for the over-height build form uprights will become apparent. Ready to roll:

Half way (1/4" clearance between the chine and the rear garage roof frame - this method won't work for turning it back over once the sheers are on):

Roll complete. With the use of the semi-circular ply frames this was a one-person operation:

Yesterday I ripped the sheers. Next job is to figure out the shape of the side sections of frame 2 to transition from standard frame 4 (plus 1" height) to barrel transom - the MDF temporary section will be hacked around until the sheer line sits right, then I'll work on the side batten positions at frame 2 (I'm cold-moulding the aft topsides so need battens). Once the shape looks right I'll transfer the shape to oak and finish frame 2 properly. I figured I'd never be able to do this by eye with the boat upside down, hence the premature flip.
At the moment I think I'll fair the topside frames aft while the boat is right way up and skin all but the forward 8' (which will be sheet 6mm ply) because with the tumblehome it's easier this way up. Then roll it back again, fair and skin the topsides forward, then move onto the bottom.
And now the reason for the over-height build form uprights will become apparent. Ready to roll:
Half way (1/4" clearance between the chine and the rear garage roof frame - this method won't work for turning it back over once the sheers are on):
Roll complete. With the use of the semi-circular ply frames this was a one-person operation:
Yesterday I ripped the sheers. Next job is to figure out the shape of the side sections of frame 2 to transition from standard frame 4 (plus 1" height) to barrel transom - the MDF temporary section will be hacked around until the sheer line sits right, then I'll work on the side batten positions at frame 2 (I'm cold-moulding the aft topsides so need battens). Once the shape looks right I'll transfer the shape to oak and finish frame 2 properly. I figured I'd never be able to do this by eye with the boat upside down, hence the premature flip.
At the moment I think I'll fair the topside frames aft while the boat is right way up and skin all but the forward 8' (which will be sheet 6mm ply) because with the tumblehome it's easier this way up. Then roll it back again, fair and skin the topsides forward, then move onto the bottom.
Re: UK Zip Build
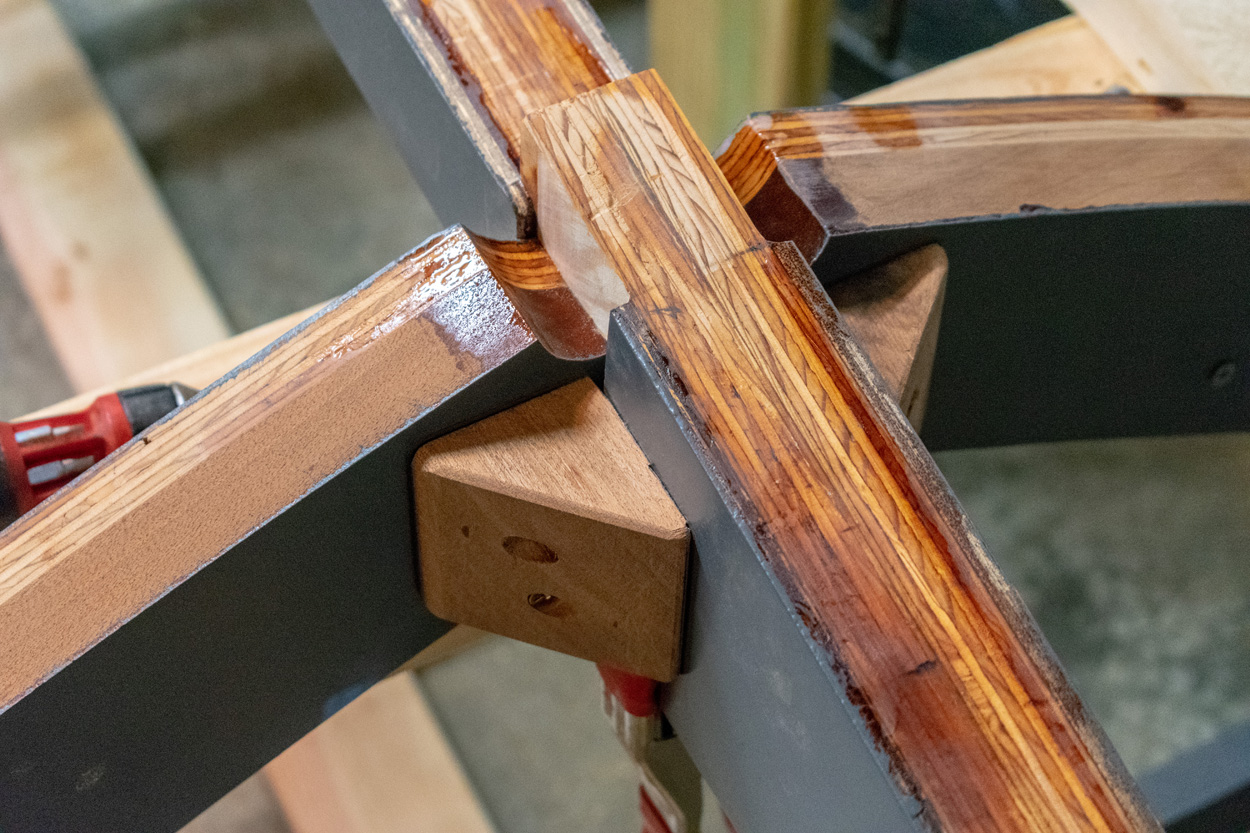
Port inner sheer attached permanently to stem and frames 4 and 5 1/2. Battens tacked in place to figure out the shape of frame 2 side members needed for a fair curve to the topsides aft:

This doesn't look anything special in the photo but being able to walk around the boat and see in wood (even temporarily) the shape that has been in my head for the past year is extremely exciting.
Bits of scrap tacked in place to hold the shape:

I then removed this temporary frame section (it's not epoxied to the lower frame), transferred it to card and created a fair curve based upon the points I'd set. Next step will be to cut another temporary frame section based upon my card pattern just to verify that it works in 3D, then transfer to oak.
I've been very glad that a boatbuilder/timber supplier persuaded me to work with yellow cedar for the longitudinals - it has very straight grain and bends really well. It is perhaps rather softer that many alternatives so I have to be careful not to damage it on the hard edges of oak frames but otherwise it's a real pleasure to work with.
This doesn't look anything special in the photo but being able to walk around the boat and see in wood (even temporarily) the shape that has been in my head for the past year is extremely exciting.
Bits of scrap tacked in place to hold the shape:
I then removed this temporary frame section (it's not epoxied to the lower frame), transferred it to card and created a fair curve based upon the points I'd set. Next step will be to cut another temporary frame section based upon my card pattern just to verify that it works in 3D, then transfer to oak.
I've been very glad that a boatbuilder/timber supplier persuaded me to work with yellow cedar for the longitudinals - it has very straight grain and bends really well. It is perhaps rather softer that many alternatives so I have to be careful not to damage it on the hard edges of oak frames but otherwise it's a real pleasure to work with.
Re: UK Zip Build
Final profile of frame 2 side sections (left) compared to the standard shape (right) that I'd already cut before deciding to make some changes:

The broad base is to improve stiffness (in theory) since I won't have a full deck beam at this frame position.
Port inner sheer fully glued in place; starboard one going on:

The broad base is to improve stiffness (in theory) since I won't have a full deck beam at this frame position.
Port inner sheer fully glued in place; starboard one going on:
Re: UK Zip Build
The plywood hull planking will stabilize that area, especially with that tumblehome. A little extra thickness on that frame member won't hurt anything though. I like your method of finding that frame profile!