
Mist Miss - Desert Build
Moderator: BruceDow

Re: Mist Miss - Desert Build
Agreed. And depending upon your ability to see the hull shape, the fairing is going to take time as well. If you try to build on a time line, you are going to hate it after awhile (sort of like working at that point). Set goals yes, but mostly just consistently work on it .
Carl
Crafting a classically styled Vera Cruise - "Can Do!"
Crafting a classically styled Vera Cruise - "Can Do!"
Re: Mist Miss - Desert Build
I can’t imagine those temps. Here in Ga we have been in the mid 90’s for some time and the humidity has been unbearable. I drip water like standing in the shower. Your build has been quiet interesting.looking good. Scarf joints were very fun for me too. Steve

Re: Mist Miss - Desert Build
Thanks Matt, Lee, Carl, and Steve,
Matt, Lee, Carl - I guess you're right, in that I shouldn't have "timelines", as I've already blown through a few so far. But (as Carl mentioned) I'm still holding on to a "goal" of doing the flip around New Year's, and will work towards that. The month-by-month breakdown was more of me laying out the next major tasks. I suspect that everything will indeed take longer than estimated, just from the variances and vicissitudes of life. That being said, having that goal keeps me going out daily and completing some tasks in a methodical order and pace, even if the heat limits it to 60-90 minute daily work sessions.
Lee - the Mist Miss is plywood, not cold moulded, so that should be a bit of time-saver. I'll have a thicker hull, so 1/2" in the stern, and two layers of 1/4" at the bow. And since I plan on having a bright finish (with some striping) I'm considering adding a layer of veneers to give it a "planked" look. One thing that has bothered me about some plywood builds I have seen is the visible delineation of plywood sheets. That's diminished with stain or paint, obviously, but it's something I'll consider. So now I'm realizing that I too may have areas of three layers.
Steve, I'm not so sure I would trade temps with you. Yes 118 degrees is a bit much (we've set or tied records each of the last four days, and July 2020 was the hottest month on record here), it's been with our typically "dry" humidity. Rarely does it get above 20% on a normal day, and even when the summer monsoons come, it bumps the humidity up to 50%, but drops the temperatures by 15 degrees. I don't believe I would survive a typical southern summer with 90+% humidity. Having a strong enough fan works pretty well (except for blowing sawdust back into my face), as it helps dry off.
The one gross thing is wearing latex gloves for epoxying. Just rivers of sweat running down my arm within minutes. I've even borrowed my son's little league sweat bands, just to keep from dripping onto the boat! Gaaack!
Slowly building a Mist Miss in the Arizona desert
Re: Mist Miss - Desert Build
Today's accomplishment: I got the keel layed in.
Not attached, mind you, but it fits completely, after some work with my keel notches on some frames (too tight tolerances on my part - needed to be widened by 1/16" of an inch) and finally was able to trim the excess and get the keel fitted snugly into the stem notch, with a stylish taper as well. I'm using the 1/4" ply backing for "padding" as recommended in the plans. Tomorrow I'll start bonding and screwing the keel to the frames, as well as bolt the keel to the stem.
Not attached, mind you, but it fits completely, after some work with my keel notches on some frames (too tight tolerances on my part - needed to be widened by 1/16" of an inch) and finally was able to trim the excess and get the keel fitted snugly into the stem notch, with a stylish taper as well. I'm using the 1/4" ply backing for "padding" as recommended in the plans. Tomorrow I'll start bonding and screwing the keel to the frames, as well as bolt the keel to the stem.
Slowly building a Mist Miss in the Arizona desert
Re: Mist Miss - Desert Build
“The one gross thing is wearing latex gloves for epoxying. Just rivers of sweat running down my arm within minutes. I've even borrowed my son's little league sweat bands, just to keep from dripping onto the boat! Gaaack!“
Yes, you can pour out a cup full when you take your gloves off. I was painting my seats in the catport yesterday and sweat running down my arm was like standing in a shower. I’d wipe my arms and brow, make 4-5 swipes with the brush, and do it all again.
Your build is looking good. Feels good when frames ,stem and transom are finally attached to the keelson. Even better when the skin is on. Steve
Re: Mist Miss - Desert Build
I dont have time for timelines.
Matt B
Matt B
Re: Mist Miss - Desert Build
Ha! - good idea, Matt
Keel is in! Poxy-Gripped and screwed (2 per frame) and the keel is carriage-bolted to the stem. It's still 107 degrees, and it's 8:00 PM, and I'm calling it a night!
I still need to decide if I'm going to use bungs or filler (famowood) or thickened/colored epoxy to fill those screw holes in the keel. Some will be faired off, though, so maybe I hold off on filling until towards the end of fairing?
Also, I may take tomorrow off just to contemplate the chine. I'm looking at my logs and I've put in work on the boat for 14 straight days. But now it's such a habit/groove I'll probably putter around anyway and end up starting the chines.
Cheers!
-Andrew
Slowly building a Mist Miss in the Arizona desert
Re: Mist Miss - Desert Build
Waiting til after fairing is no big deal. Either way, they are going to be covered over.
As for working everyday, well just do a little bit occasionally. Don't want to get burned out.
As for working everyday, well just do a little bit occasionally. Don't want to get burned out.
Carl
Crafting a classically styled Vera Cruise - "Can Do!"
Crafting a classically styled Vera Cruise - "Can Do!"
Re: Mist Miss - Desert Build
Andrew,
I found that thickened epoxy doesn't work well to fill screw holes. I tried to do that for a couple on screw holes on my Monaco keel and it just doesn't seem to work. It is hard to get the hole filled and you end up with a dimple. I suggest using bungs and I would do that before fairing. In my opinion, wood filler works okay for smaller holes but keel screw holes are pretty big and deep. I made my bungs by taking a piece of wood scrap lumber and turning it on my bench belt sander by hand but you have to pay attention doing this. It actually worked better than I thought to make them that way.
Lee
YouTube channel: Boat Builder Lee
Monaco build YouTube playlist: https://www.youtube.com/channel/UCP4Edb ... /playlists
Monaco build YouTube playlist: https://www.youtube.com/channel/UCP4Edb ... /playlists
Re: Mist Miss - Desert Build
Thanks Carl and Lee,
At this point I think bungs might be the way to go, just because of the depth. I used Famowood for covering the screws on the transom and floor timbers on the frames, but those were in-plywood counter-sinks where the #8 screw heads sank themselves (and thus the holes weren't that deep).
With the #14 keel screws (and deeper holes needed due to possible fairing interference), I'll have to go bigger. Fortunately I have plenty of scrap to experiment with.
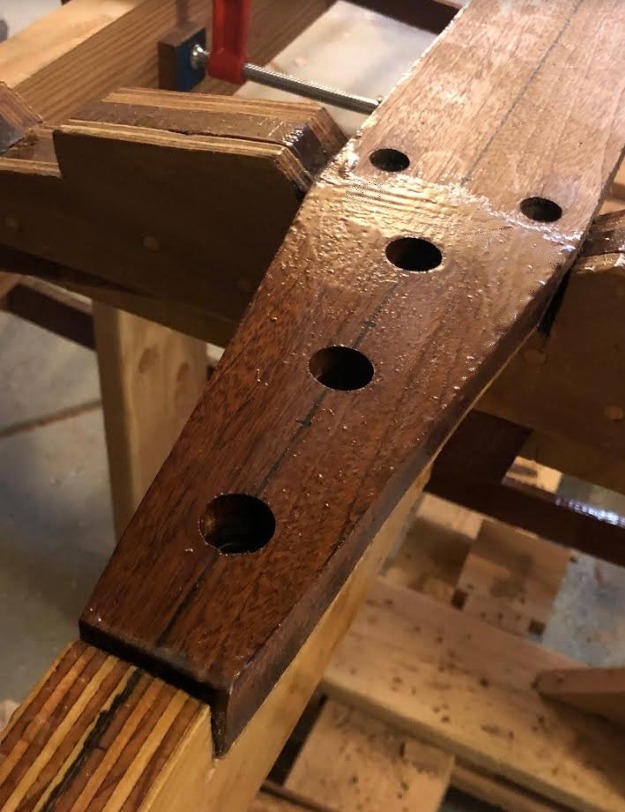
Fairly deep 5/16" carriage bolt holes for the connection between the stem and the keel - the whole head of the keel is slathered in Poxy-Grip, which will be mostly faired off anyway.
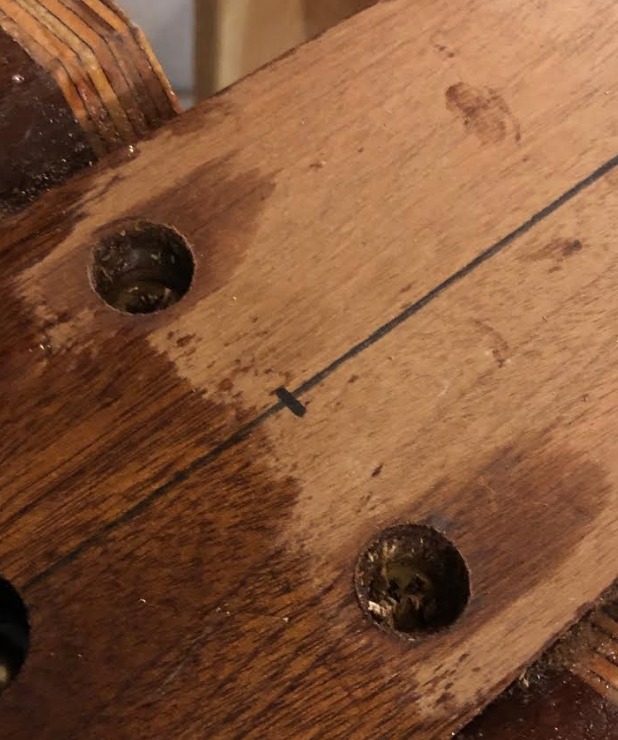
Typical of hole for keel-to-frame attachment (two 3" #14 screws). Some wax residue is still visible in there (used the tried-and-true wax toilet ring to provide for strip-free entry of the silicon bronze screws)
In terms of progress, today I had to go out and purchase some more Sapele mahogany. I thought I had enough ripped for the chines, sheer timbers, and battens, but unfortunately after review and a spell in the "chair of contemplation", I realized that all of that was S4S 4/4 stock - 13/16" thickness. That will be fine for the sheer and battens, but the chines for the Mist Miss have to be 1-1/8" x 2" (by 18 feet).
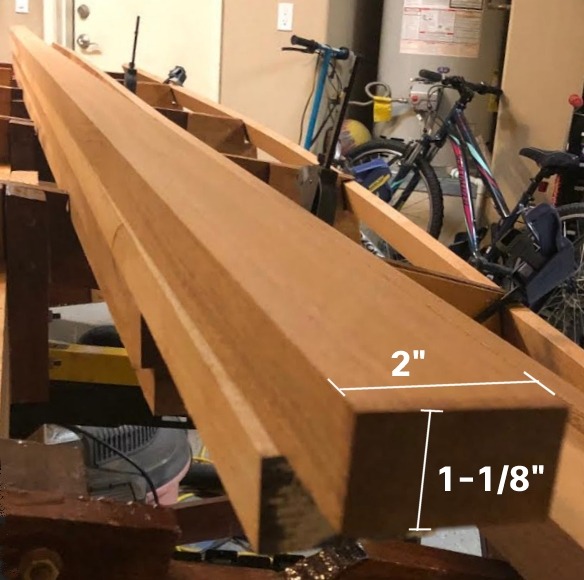
My supplier only had three pieces over 8', and let's just say they were more curvaceous than expected. in order to get four 10' pieces, I had to essentially purchase three timbers (18.6 board feet) to ensure that I had straight pieces. I gladly paid the milling fee (around $17) to get them planed down from 6/4 down to the 1-1/8" specified, and their steadier hands at precision ripping were worth it. So it looks like the next few days I'll be setting up a scarfing station for those, along with looking at possible steaming options for the bow area for both chine and sheer. As a mock-up, I was able to clamp the 4/4 boards to follow the transom-to-frame 4 curve, but that's thinner and an easier arc. It seems daunting bending that 5/4 Sapele for the bow.
At this point I think bungs might be the way to go, just because of the depth. I used Famowood for covering the screws on the transom and floor timbers on the frames, but those were in-plywood counter-sinks where the #8 screw heads sank themselves (and thus the holes weren't that deep).
With the #14 keel screws (and deeper holes needed due to possible fairing interference), I'll have to go bigger. Fortunately I have plenty of scrap to experiment with.
Fairly deep 5/16" carriage bolt holes for the connection between the stem and the keel - the whole head of the keel is slathered in Poxy-Grip, which will be mostly faired off anyway.
Typical of hole for keel-to-frame attachment (two 3" #14 screws). Some wax residue is still visible in there (used the tried-and-true wax toilet ring to provide for strip-free entry of the silicon bronze screws)
In terms of progress, today I had to go out and purchase some more Sapele mahogany. I thought I had enough ripped for the chines, sheer timbers, and battens, but unfortunately after review and a spell in the "chair of contemplation", I realized that all of that was S4S 4/4 stock - 13/16" thickness. That will be fine for the sheer and battens, but the chines for the Mist Miss have to be 1-1/8" x 2" (by 18 feet).
My supplier only had three pieces over 8', and let's just say they were more curvaceous than expected. in order to get four 10' pieces, I had to essentially purchase three timbers (18.6 board feet) to ensure that I had straight pieces. I gladly paid the milling fee (around $17) to get them planed down from 6/4 down to the 1-1/8" specified, and their steadier hands at precision ripping were worth it. So it looks like the next few days I'll be setting up a scarfing station for those, along with looking at possible steaming options for the bow area for both chine and sheer. As a mock-up, I was able to clamp the 4/4 boards to follow the transom-to-frame 4 curve, but that's thinner and an easier arc. It seems daunting bending that 5/4 Sapele for the bow.
Slowly building a Mist Miss in the Arizona desert
Re: Mist Miss - Desert Build
Checking in after a while. I had a setback with the chines, which I'll detail below. From what I can gather elsewhere on the forum, it's basically a rite of passage, so I must be on the right track, right?
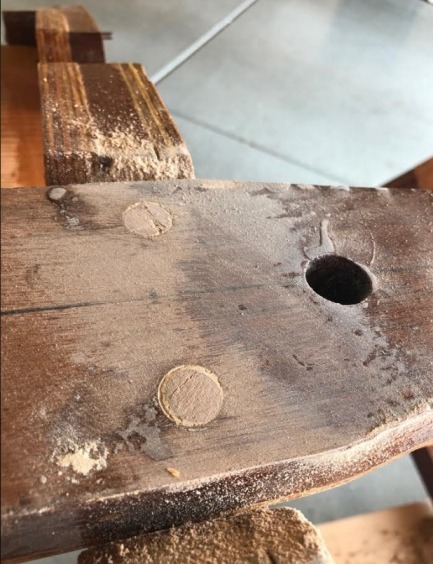
I did have some success with the larger bungs for the #14 screws attaching the keel to the frames. They still required a bit of Famowood on the edges. I basically added a dab of Famowood at the bottom of the hole, rolled the bung in it as well to coat the sides, and then hammered in (though I'll have to do a better job of aligning the grain next time). Cutting off and sanding went very smoothly. The remainder of the project doesn't use such large screws (#10's and #8's mostly), so my bung cutter should be able to accommodate and fully fill the holes going forward.
When I last posted, I had just acquired some nice 6/4 Sapele that was milled to 2" widths by 10' lengths, for the most part. Scarfing of these into 20' lengths actually went well (better than the keel, anyway). But re-reading the above post, about the squirrelly lengths, I should have paid more attention to that.
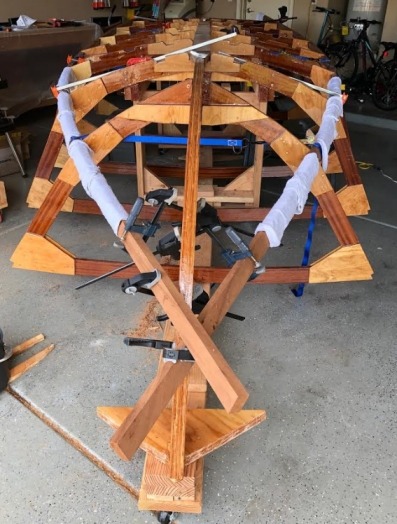
I was able to place the chine logs into the notches I had made in the frames several months ago. Some had to be slightly enlarged (using a rasp file for the most part). Using some come-alongs and almost my entire collection of clamps, I had most of the pieces into position, keeping them looser towards the bow. The chine on the Mist Miss (and probably most designs) has to curve down (up), while curving inward towards the stem, while twisting as well.
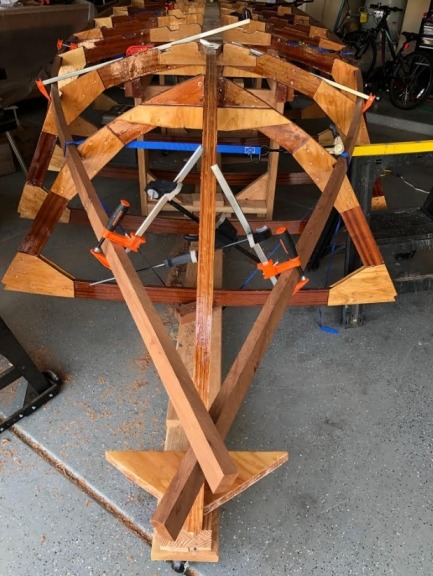
I used the boiling water and hot towel approach, which really seemed to be working. I wasn't going to attach them fully, but I wanted to get them curved in and holding that shape. The next day I would start attaching, and finish the bending, thinking that the chines would "hold" in their new semi-bent position. I was surprised how quickly the boiling water cooled off, but the sapele seemed to be keeping the heat. Seemed simple.
The next morning I went out to check on the chines and prep to do the final alignment. I wanted to do both sides at the same time, alternating to keep everything as square as possible elsewhere on the rig. That's when I discovered this:
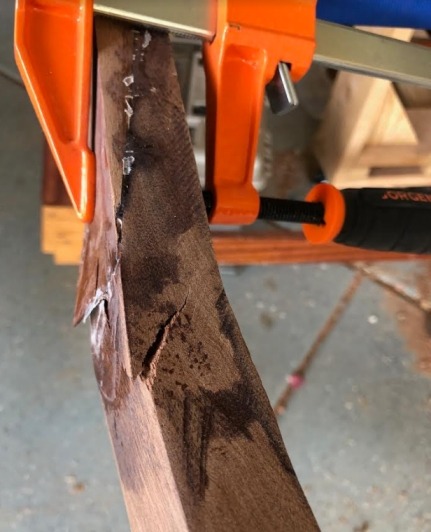
This is way back just in front of the scarf joint (which you can see slightly aft of the crack). I never heard the tell-tale "CRACK" at any point. It seems the sapele itself gave up overnight. The orange bar clamp is there just to hold the scarf together (and the white lines are some leftover wax paper scraps), but that joint itself didn't fail, but the wood did leading up to the scarf.
I'm thrilled beyond belief - can't you tell?
Looking closer, it seems that the weird squirrelly and non-straight grain in that area of the plank was to blame. The other side that survived (starboard) had pretty much straight grain from both pieces at the scarf joint, with the odd grained area well aft (and likely to be trimmed off beyond the transom). But it was me not paying attention to the grain when I assembled the scarf a week earlier that caused the issue.
So I then had to go back to my supplier and buy 2 additional 10'-plus lengths of 5/4 S4S, but disappointingly, they didn't have those lengths any longer (longest was 7' in 6/4). Sadly, I ended up getting 8/4 milled down (what a shame). But this weekend I started back up scarfing the new pieces, and keeping the "good" end of the original pair in reserve.
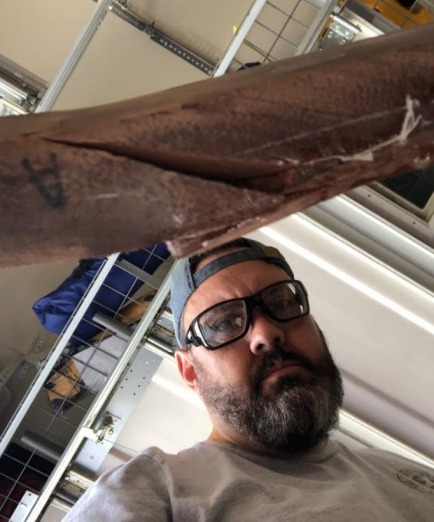
The worst part is while disassembling the broken chine, it dropped and hit me in the leg, slicing my shin open with ragged edge sapele. Of course I was wearing shorts because it's been record heat here all summer, and it was 112 degrees at the time.
The heat, the setback, and the injury were enough for me to stop for a few weeks. We had some family dinners, and Labor Day weekend I just relaxed. The gash on my leg is finally healed (with an ugly scar, one of several from the sharp edges of the frames). Come "winter" here in Phoenix, I'll be able to wear pants again.
Anyway, just thought I'd give everyone an update since it had been a few weeks and I had left off on a high note. The temperatures are supposed to top out in the low 100's this week, so I'm hoping to get the chines attached in the next week (fingers crossed).
I did have some success with the larger bungs for the #14 screws attaching the keel to the frames. They still required a bit of Famowood on the edges. I basically added a dab of Famowood at the bottom of the hole, rolled the bung in it as well to coat the sides, and then hammered in (though I'll have to do a better job of aligning the grain next time). Cutting off and sanding went very smoothly. The remainder of the project doesn't use such large screws (#10's and #8's mostly), so my bung cutter should be able to accommodate and fully fill the holes going forward.
When I last posted, I had just acquired some nice 6/4 Sapele that was milled to 2" widths by 10' lengths, for the most part. Scarfing of these into 20' lengths actually went well (better than the keel, anyway). But re-reading the above post, about the squirrelly lengths, I should have paid more attention to that.
I was able to place the chine logs into the notches I had made in the frames several months ago. Some had to be slightly enlarged (using a rasp file for the most part). Using some come-alongs and almost my entire collection of clamps, I had most of the pieces into position, keeping them looser towards the bow. The chine on the Mist Miss (and probably most designs) has to curve down (up), while curving inward towards the stem, while twisting as well.
I used the boiling water and hot towel approach, which really seemed to be working. I wasn't going to attach them fully, but I wanted to get them curved in and holding that shape. The next day I would start attaching, and finish the bending, thinking that the chines would "hold" in their new semi-bent position. I was surprised how quickly the boiling water cooled off, but the sapele seemed to be keeping the heat. Seemed simple.
The next morning I went out to check on the chines and prep to do the final alignment. I wanted to do both sides at the same time, alternating to keep everything as square as possible elsewhere on the rig. That's when I discovered this:
This is way back just in front of the scarf joint (which you can see slightly aft of the crack). I never heard the tell-tale "CRACK" at any point. It seems the sapele itself gave up overnight. The orange bar clamp is there just to hold the scarf together (and the white lines are some leftover wax paper scraps), but that joint itself didn't fail, but the wood did leading up to the scarf.
I'm thrilled beyond belief - can't you tell?
Looking closer, it seems that the weird squirrelly and non-straight grain in that area of the plank was to blame. The other side that survived (starboard) had pretty much straight grain from both pieces at the scarf joint, with the odd grained area well aft (and likely to be trimmed off beyond the transom). But it was me not paying attention to the grain when I assembled the scarf a week earlier that caused the issue.
So I then had to go back to my supplier and buy 2 additional 10'-plus lengths of 5/4 S4S, but disappointingly, they didn't have those lengths any longer (longest was 7' in 6/4). Sadly, I ended up getting 8/4 milled down (what a shame). But this weekend I started back up scarfing the new pieces, and keeping the "good" end of the original pair in reserve.
The worst part is while disassembling the broken chine, it dropped and hit me in the leg, slicing my shin open with ragged edge sapele. Of course I was wearing shorts because it's been record heat here all summer, and it was 112 degrees at the time.
The heat, the setback, and the injury were enough for me to stop for a few weeks. We had some family dinners, and Labor Day weekend I just relaxed. The gash on my leg is finally healed (with an ugly scar, one of several from the sharp edges of the frames). Come "winter" here in Phoenix, I'll be able to wear pants again.
Anyway, just thought I'd give everyone an update since it had been a few weeks and I had left off on a high note. The temperatures are supposed to top out in the low 100's this week, so I'm hoping to get the chines attached in the next week (fingers crossed).
Slowly building a Mist Miss in the Arizona desert
Re: Mist Miss - Desert Build
You're doing great. Most of us have dealt with that issue. You REALLY have to watch the grain of the wood in the bending areas.

Re: Mist Miss - Desert Build
Could you use half thickness chine logs and laminate two layers to get to full thickness?
I find when things arent going well I make even more mistakes if I push on while frustrated, if I take a break for the day or two and regroup it usually ends better.
I find when things arent going well I make even more mistakes if I push on while frustrated, if I take a break for the day or two and regroup it usually ends better.
Re: Mist Miss - Desert Build
Thanks for the encouragement, Matt and vupilot (sorry, I don't know your name, but probably should). If this next attempt also cracks, then I'll consider the lamination approach. The starboard side didn't have much difficulty in making the bend on the first attempt, so I think the wonky grain was the problem. The crack was along the grain at basically a 40-degree angle to straight-line.
In the meantime, I'm set up to mimic the "Tips from a Shipwright" approach to steaming in place, found on YouTube here: https://www.youtube.com/watch?v=--iPQIwSEJM
I also like Matt B's (Hercdrvr) comment in FL-John's Florida Barrelback thread: "Steam and anger gets the job done."
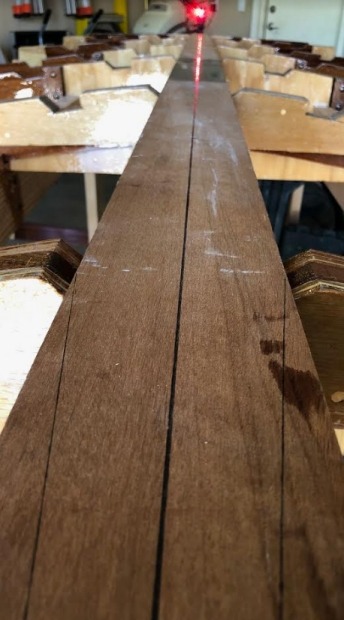
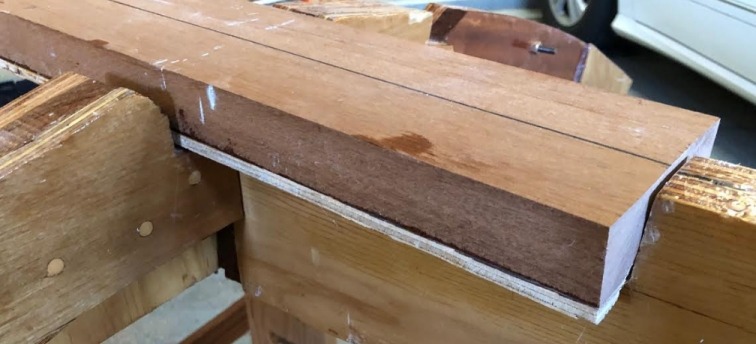
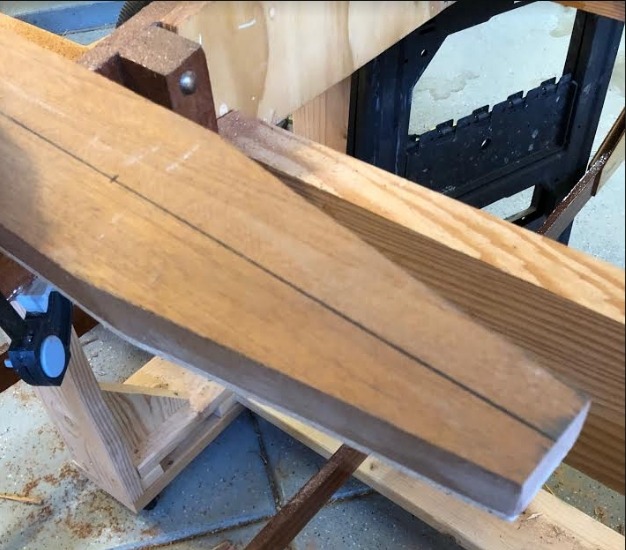
Take two on the port chine scarf underway. My scarfing "system" has finally been repeatable, at least for lengthy narrower planks, such as chines, sheer, battens. The original chine scarfs were 8" scarfs over the 1-1/8" thickness. The new one is a 10" scarf, which is the longest I can do using my radial arm saw. I know others have used other approaches (planing, table saw, etc.), but this one has provided the most consistent results. I then put them in a jig with a 2" wide slot by 24" long channel.
So how do you scarf two 10' pieces into an 18' garage? Very carefully. With warning signs.

You've been warned!
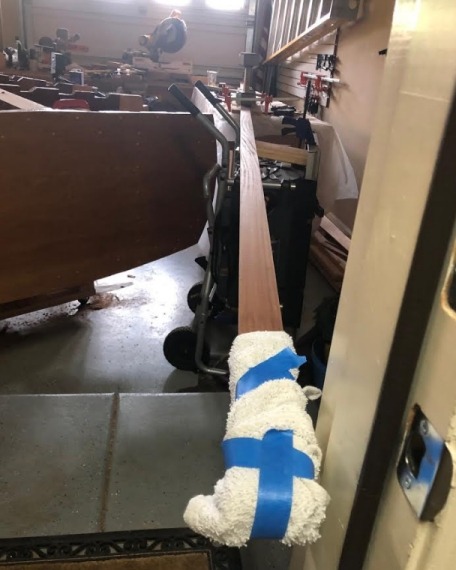
Can just get the garage door closed (by about an inch)
In the meantime, I'm set up to mimic the "Tips from a Shipwright" approach to steaming in place, found on YouTube here: https://www.youtube.com/watch?v=--iPQIwSEJM
I also like Matt B's (Hercdrvr) comment in FL-John's Florida Barrelback thread: "Steam and anger gets the job done."
Take two on the port chine scarf underway. My scarfing "system" has finally been repeatable, at least for lengthy narrower planks, such as chines, sheer, battens. The original chine scarfs were 8" scarfs over the 1-1/8" thickness. The new one is a 10" scarf, which is the longest I can do using my radial arm saw. I know others have used other approaches (planing, table saw, etc.), but this one has provided the most consistent results. I then put them in a jig with a 2" wide slot by 24" long channel.
So how do you scarf two 10' pieces into an 18' garage? Very carefully. With warning signs.
You've been warned!
Can just get the garage door closed (by about an inch)
Slowly building a Mist Miss in the Arizona desert
Re: Mist Miss - Desert Build
Hindsight on my chines, I should have laminated. Bending white oak that thick was not an easy feat. The sheer was so easy because that thickness x’s 2 bent so much better. Rita of passage is the proper statement. Looking good.
On the holes you filled with the bungs, I simply used epoxy only slightly thickened. Kinda runny. All the carriage bolt holes. A little thicker on the transom countersinks so it wouldn’t run out. I had no problems of dimples. Your keel will be covered anyway. Fun when you start fairing and your plane gets into those #14’s or the carriage bolts. Plays havoc with an edge. Steve
On the holes you filled with the bungs, I simply used epoxy only slightly thickened. Kinda runny. All the carriage bolt holes. A little thicker on the transom countersinks so it wouldn’t run out. I had no problems of dimples. Your keel will be covered anyway. Fun when you start fairing and your plane gets into those #14’s or the carriage bolts. Plays havoc with an edge. Steve