SHOW US YOUR SHOP MADE TOOLS

Let's all discuss the tools here

Moderators: BruceDow, billy c

User avatar
raymacke
Posts: 752
Joined: Mon Apr 25, 2005 7:07 pm
Location: Marissa, IL
Contact:

SHOW US YOUR SHOP MADE TOOLS

Post by raymacke »

Thought a thread about shop made tools and fixtures might be of interest to many. Most of us build our projects because we want a custom built boat so I am betting many also fabricate tools to help the process along. In my case many of these are crude but yet still get the job done - pretty don't count. My point is don't be afraid to show us what you have. We all know most of these aren't made for show. I'll start if off but am hoping others join in.

********************************************

I was asked about a PVC roller behind my table saw which was partly visible in another photo. It is a outfeed table I put together from 2 x 4's and 3" PVC schedule 40. The pipe ends were plugged with some 3/4" plastic sheeting I had around the shop but 3/4 plywood would work wee too. The axles are cut off bolts with the smooth shanks sticking into the end plugs. On the legs there are screw in type feet that allow me to adjust the height.

I originally built it as just 3 rollers with nothing between. This worked fine with flat lumber but then cutting warped pieces or thin plywood it was a problem. The far end would drop down and hit the rollers below center and hang. Not a good situation! I added the flat fill in pieces between the rollers using scrap paneling. On a whole it works well and allows me to rip 8' sheets with little problem.

Image

Image
User avatar
Dave Grason
Posts: 3773
Joined: Wed Dec 24, 2003 5:19 am
Location: Lake Barkley, KY

Post by Dave Grason »

Very cool, Ray. You don't mind if I use that idea do you?

Ok, I'll go next. I've had this old Craftsman table saw for like about 30 years. I bought it at a yard sale and it didn't have a fence. So I got it real cheap. But I had been looking at some of the new saws and their fancy fences where they would have one lever that you would flip up, slide the fence where you wanted it and then flip the lever down. Nowadays, virtually all table fences are built that way but back in the 80s, they hadn't come into vogue yet. I built this fence out of square steel tubing, made a locking cam from a piece of steel rod that I drilled a hole in offcenter and it works. In fact, it has worked for all these years and it still keeps on working. I'm still using it even today. Study the photos and you'll see what I mean.

Image

Image


Oh, here's a view from the side. But this one also has a can of paste wax on the table. I keep paste wax on hand cause it makes ALL my tools surfaces smooth and helps the wood slide through really easily. ...not to mention that it keeps the rust at bay, too.

Image
Isn't it amazing!! The person that never has the fortitude to pursue his own dreams, will be the first to try and discourage you from pursuing yours.
User avatar
Dave Grason
Posts: 3773
Joined: Wed Dec 24, 2003 5:19 am
Location: Lake Barkley, KY

Post by Dave Grason »

Here's a quick photo of my height adjuster. I don't recommend this for everyone because you do need to be careful with it. It can hit the end of the adjustment and whip around smacking your wrist pretty good. But dang it sure is easier than cranking on the darn thing by hand, expecially when the crank is broken.

Image


Since this next photo was taken, I bought a miter saw. But before the miter saw I had no way of making large repetitive crosscuts. So I made this sliding tray. Here is a tob view and a bottom view:

Image

Image


Believe it or not, I'm still not through modifying this table saw. Since these photos were taken, I've gotten a fold up table saw that is really handy. Also, the legs on this table saw have always been very weak. Finally one of them folded up and collapsed. So I just tossed the whole stand away and I'm in the process of building a cabinet that the table saw can sit on. It will have drawers, electric plugs and rollers so I can move it around the shop. Since the concrete floor is not totally level, there is a sweet spot for the saw where I got it leveled out. So then I just marked the floor and each time I need to use the saw, I move it right to those marks and I no longer have to level the saw each time I want to use it.

I'm going to get a sanding disc to replace the blade on this saw. That way I can use my folding table saw for smaller stuff and this saw for sanding frames and such.
Isn't it amazing!! The person that never has the fortitude to pursue his own dreams, will be the first to try and discourage you from pursuing yours.
User avatar
raymacke
Posts: 752
Joined: Mon Apr 25, 2005 7:07 pm
Location: Marissa, IL
Contact:

Post by raymacke »

Nice fence. I paid more for my very similar Biesemeyer fence than I did for the table saw! Also, the guys on the Kentucky River must have been in your shop. They too use a heavy drill in place of a hand crank. BUT they open a lock gate with it!

Image
User avatar
kens
Posts: 6012
Joined: Wed Nov 12, 2003 5:25 pm
Location: Coastal Georgia

Post by kens »

"crude but yet still get the job done - pretty don't count"

I not too sure you would want to see some of my stuff. Rube Goldberg would laugh.
User avatar
BruceDow
Posts: 2132
Joined: Sat Jun 17, 2006 2:21 pm
Location: Toronto, ON, Canada
Contact:

Post by BruceDow »

Home-made featherboards.

1/8" masonite. Cut to 3/4" x 6". Hammered into saw Kerfs cross-cut at a 45 deg slant in some scrap 3/4" stock.

Image
Bruce.

~~ Do what you love, and love what you do. ~~
~~ To me - only my boat is not yet perfect. Everybody else's is to be admired for I know the path they have walked (Dave Lott, 2010) ~~
Dow's Monaco Project
User avatar
raymacke
Posts: 752
Joined: Mon Apr 25, 2005 7:07 pm
Location: Marissa, IL
Contact:

Post by raymacke »

A companion to the outfeed table at the top of this thread is this roller stand I built to sit to the left of the table saw. It affords support of sheets when cutting strips off the ends. I made the legs fold to accommodate storage when not in use. It works well but needs to be aligned parallel to the fence or it tends to cause binding.

It is overbuilt by about 100%. 1 x 4 material should have be used rather than 2 x 4. It would have made it much lighter to handle when storing but still strong enough to support 3/4" plywood.

Image

Image

Image

Image
User avatar
Dave Grason
Posts: 3773
Joined: Wed Dec 24, 2003 5:19 am
Location: Lake Barkley, KY

Post by Dave Grason »

Very nice stuff, Bruce AND Ray.

Ray, did you start this thread just to show off? That out feed table is something I've never seen before. It looks GREAT! I was looking at your True Grit build photos and I noticed that you still have a number of other self-made tools there as well.
Isn't it amazing!! The person that never has the fortitude to pursue his own dreams, will be the first to try and discourage you from pursuing yours.
Tbone
Posts: 44
Joined: Sat Oct 27, 2007 1:21 pm
Location: SFO Bay Area and California Delta

Post by Tbone »

This is a great thread. As Kyle and I are slowly moving along with the Squirt, we are constantly looking for tools and jigs to help us along. Must of what we came up with are not very glorious (sanding boards and a guide for a hand plane). Hopefully some of the more seasoned boat builders can show a few of their tools/toys.
User avatar
Dave Grason
Posts: 3773
Joined: Wed Dec 24, 2003 5:19 am
Location: Lake Barkley, KY

Post by Dave Grason »

Tbone wrote: Must of what we came up with are not very glorious (sanding boards and a guide for a hand plane)..
They don't have to be as long as they work. :D In fact, as far as I'm concerned, when it comes to home made tools that work, ugly is cool. And they give your work shop that aura that stuns people when they take the nickle tour. If you don't believe me, take a look at Ray's True Grit build and just study the background in the photos. There's so much stuff there that I myself want to take a trip up there just to see the place. ...if he'll let me. lol

Here are a couple of tools I'm working on myself.

The zip is ready to have the deck built. For a long time, I've obsessed over how to get my covering boards exactly the same on the INSIDE curve. The outside curve will be easy. But if that inside curve is not absolutely dead on, it will show like there's no tomorrow. Also, if the curve is unfair, that will also stick out like a sore thumb. At one point, I even surmised that steam bending the boards around a form might be one solution. But now, I think I've come up with a better one.

I'm going to make a rather flexible sanding board that will be about 6 ft long. I'm thinking I'll make it from ¼" ply or less. Hardwood flooring supply stores sell sand paper in all the grits in big rolls for some of the older style drum sanders that weren't set up for pre-cut belts. It'll be a little pricey to buy a couple of those big rolls of sandpaper but it will give me a lifetime supply for my purposes. With those rolls I can cut paper to fit my flexible board. The board will have 4 pegs put in it so that it can be used by 2 people. When I'm ready to do my covering boards, I'll cut the inside curves very close to my layout lines. I'll do starboard and port together so that they are either face to face or back to back. It doesn't really matter. Once I get the inside curve's rough cut done, I can simply lock the 2 pieces of wood in the bench vise together, face to face let's say, and lightly start sanding the wood to the line. It'll take a helper with both of us working together. Miss Connie said she'd be happy to help with that. (She's really getting into this boatbuilding thing thanks to the Gatherings) Ok, so that's one problem solved with a homemade tool, here's the other:

I'm working on a router jig that will vastly speed up the fairing of the chines and sheers while insuring perfect results. This may actually be something that will have to be custom built for each boat. But I've got it pictured in my mind and, if it works, the fairing process will go in just a few hours and the results will be absolutely dead on perfect.
Isn't it amazing!! The person that never has the fortitude to pursue his own dreams, will be the first to try and discourage you from pursuing yours.
User avatar
ttownshaw
Posts: 2337
Joined: Thu Mar 01, 2007 7:33 am
Location: Owasso, Oklahoma
Contact:

Post by ttownshaw »

Well, this one is not pretty (Dave) but it works great. I'm sure many of you have built jigs like this before...extra scrap left around...need something to prevent router tear-out...I put this together with scraps from the transom trim to cut in the batten notches on the transom while tilted at 12 degrees. Since the scrap was already cut to 12 deg on one edge I just put the opposing edges toward each other to get the 12 degree angle on a flat surface :? sounds confusing when I say it. The cross pieces limit the travel of the router to cut perfect 2" wide notches.

Image

Dave, a six foot two-person sanding block? How in the heck do you get help sanding? All my friends and neighbors will gladly drink my beer while I work; ask them to help and suddenly they disappear.
Bill

I told my wife we needed a three-car garage for my projects...she told me to ask her for permission next time before I buy a house.
http://www.unitybuild.net
User avatar
Dave Grason
Posts: 3773
Joined: Wed Dec 24, 2003 5:19 am
Location: Lake Barkley, KY

Post by Dave Grason »

ttownshaw wrote:Dave, a six foot two-person sanding block? How in the heck do you get help sanding? All my friends and neighbors will gladly drink my beer while I work; ask them to help and suddenly they disappear.
ROTFLOL! OMIGOODNESS, do you want the long or short version to this question?

Here's the short version: I remind them that, when my boat is on the water, I'm not sharing it with those that didn't help when asked.

Now the long version:

This is a real sore point with me. I love boating SO much but my family never had a boat when I was growing up until my bro and I got into our teens. We're twins BTW. He bought a sail boat and we sailed quite a bit. But any other time that I got to go boating, I had to wait for someone to invite me and I must have been really socially retarted or something because I just never got invited. Sometimes someone would invite me and then before we got to go, they'd cancel. Then later I'd find out they went without me. That hurt.

I started laying out the plans to my boat projects years ago and a lot of people had fun at my expense. They said I'd never get a boat built. At first it was funny, but after a long time of it, it got old and it wasn't funny anymore. But it didn't stop. When I started my Zip, I got poked fun of even more. Now I'm real thick skinned most of the time and I'm a heck of a kidder but I've always tried very hard never to let my own kidding of others be of a derogatory nature. But that hasn't stopped my naysayers from having their way with me.

Now the Zip is showing real promise and I have to say that the quality of the workmanship is really very good. I'm very proud of it. Folks are starting to shut up. It feels good. The project is winning people over and some are actually helping when I ask. Many people are amazed that such a feat is even possible. Miss Connie is by biggest fan and my most vocal proponent. She does not let anyone diss the project behind my back. And it's a rare occasion that, if I need some help, she turns me down. And then, she usually has something really important going or she'll run right out to the shop and help me.

I have a teenage nephew who thinks his old uncle is one of the coolest people he knows. If I ask him for help, he not only comes running, but he brings his friends so that can see what I'm doing too. Oh yeah, I'm taking all of them boating. LOL

Ok, I wrecked the thread. Let's get back to tools. :oops:
Isn't it amazing!! The person that never has the fortitude to pursue his own dreams, will be the first to try and discourage you from pursuing yours.
Kevin Morin
Posts: 784
Joined: Thu Jan 24, 2008 11:36 am
Location: Kenai, Alaska

Davis Jig for Building Welded Boats

Post by Kevin Morin »

A friend who lives in Oregon, Jack Davis, and I were having an online discussion about building small metal boats, and during the conversation we remarked about our backs not being 25yr. old, any more.

Image

Jack and I decided to do something to put the joy back in skiff building, and this was our preliminary idea. This rotisserie jig is call the Davis Jig after Jack's innovation of the features. Here there is a jon boat or garvey planned on the jig. the after former is shown attached to a metal angle frame, and the lines of the keel and chines are shown roughly.

Image

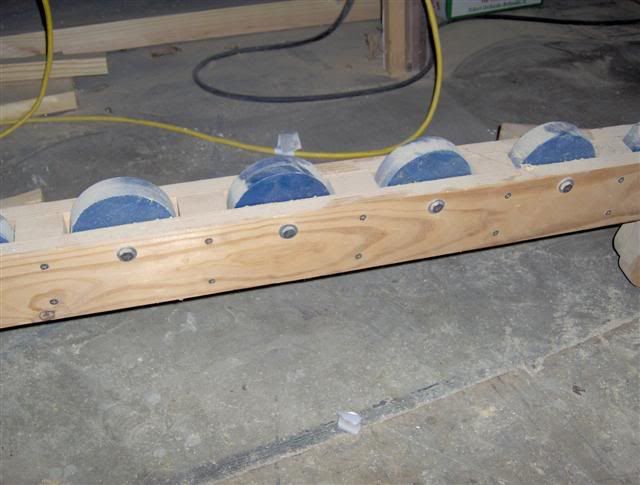
The jig as it first appeared in our shop, with a 4" x 6" x 3/8" rectangle as the strong back. Its mainly made of scrap pipe and parts we had around, so the pivots and clamps are a little random.

Image

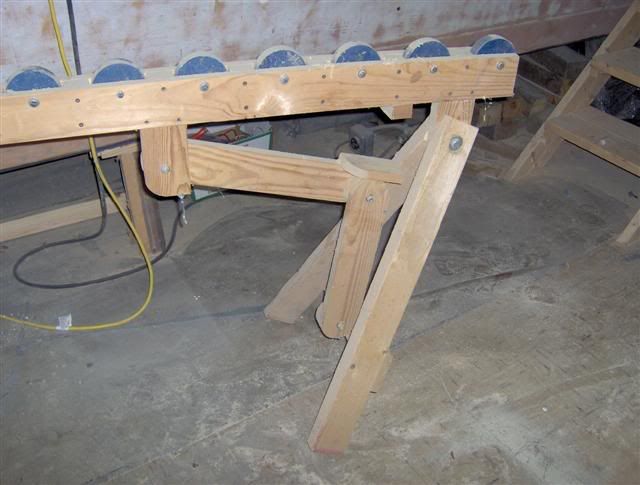
The vertical uprights are pinned into the pivot housing so they can be raised and lowered. This puts the skiff at "old man's" height for working, easy to reach and not get too tired to make a decent weld.

Image

Just a close up of the concentric pipe sizes used to make most of the jig's moving parts.

Image

These aluminum station frame clamps hold the skiff or stations or sub jigs onto the Davis Jig strong back allowing different skiffs to be set up in a few minutes. They are two pieces of 2" x 1/4" T welded to a piece of 4" x 3" x 1/4" and drilled outside the main 4x6 box.

Image

Here is a 17' rowing dory tacked up on the Davis Jig, note the stations are only 4" channel tacked flat to the deck in three places

Image

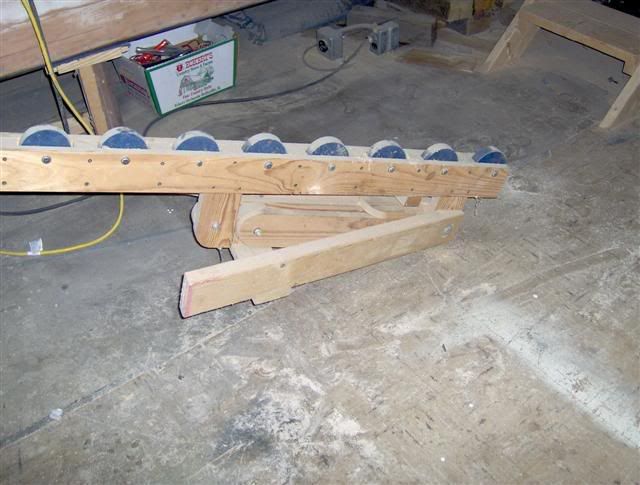
Here a 14'er is being tacked up, the station frame clamps hold an after bottom forming jig and the forward point only holds the keel for a very short distance. This cupped after frame allows the bottom's (roughly) cylindrical shape to be tacked into the bottom panel without permanent internal transverse framing.

I realize that not everyone is as completely "skiff crazy" enough to spend the time and materials to make a fixture of this size. I include it here to show how much more simply we could build small boats if we can rotate them round their keels or waterlines, and pick them up and down.

I would not have been able to build these skiffs without the fixture as my old joints won't contort enough to fit into the spaces I'd designed -unless I could move those spaces so I could stand and reach into them. That included working overhead, flat footed on the shop floor with the skiff upside down over me, where i could just reach up and weld, or fit and not have to bend below the knees to reach in some tight corner. [My days of casually kneeling down and welding at arm's length below by bent knees is pretty much gone.]

If you look closely you'll see the rotisserie power/gear in the first sketched image was never added; we'd intended hydraulics and roller chain to pivot the main beam and its uprights, but the monorail overhead lift does fine. By lowering the verticals nearly to the floor or raising them to nearly the hubs, you can get a rotation that makes every single seam about shirt pocket high. Just about right, not to high but not too low, and if they are one or the other; roll her just bit more to make the weld seams more available.

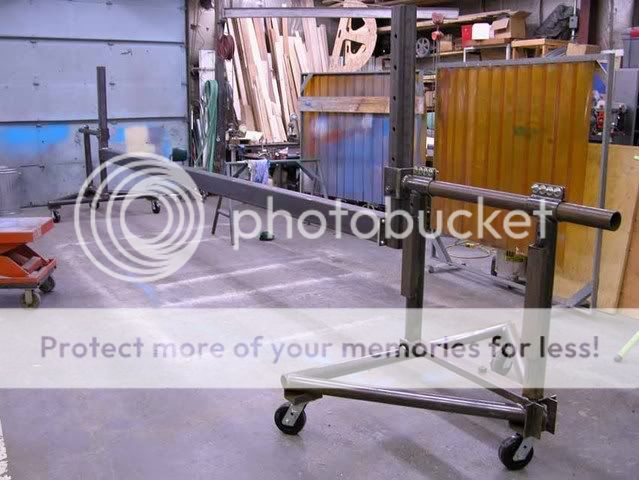
Personally, I think this would be just as handy- maybe more so than for metal, for a wooden boat project? I don't think you'd have to buy every piece of metal in one of these jigs, making them too costly for very small shops. I think most areas would have enough surplus metal around to improvise the majority of the Davis Jig, we didn't machine any parts, they all fit concentrically in their original sizes.

cheers,
Kevin Morin
Kevin Morin
User avatar
ttownshaw
Posts: 2337
Joined: Thu Mar 01, 2007 7:33 am
Location: Owasso, Oklahoma
Contact:

Post by ttownshaw »

Dave, I laugh right along with my friends...someday I'll be laughing on the water. Great Spririt Dave!


Kevin...awesome tool! I had something similar for a VW bug that I used to replace parts of a rusted pan.
Bill

I told my wife we needed a three-car garage for my projects...she told me to ask her for permission next time before I buy a house.
http://www.unitybuild.net
User avatar
raymacke
Posts: 752
Joined: Mon Apr 25, 2005 7:07 pm
Location: Marissa, IL
Contact:

Post by raymacke »

I vote to have Kevin's "Davis Jig" removed from this thread. The fact that it is extremely functional is fine but it is just far too elegant to be posted here. :D Beautiful piece of equipment!
Post Reply

Return to “Tool Talk”