

Setting up the Woodstar PT 85
First I had to replace the power plug. Annoying but trivial.
The PT 85 is small enough to put on a standard Black and Decker WorkMate and there are holes in the base of the machine to clamp it down. (Do set it up along the length of the bench to give yourself a longer base.)
Then I ran a scrap piece of Oak over the planer. Very nice except for the ends which suffered horrible sniping. The result for the middle of the board was excellent.
Time to break out the articles from old woodwork magazines about setting up a planer.
The Woodstar is really quite simple to set up for planing. There are two settings
The infeed table
This is set up by twisting a knob at the end of the table which moves it up or down. Moving back down is by means of a spring, which tends to catch and then slip. So to get any sort of accuracy, bring the table lower than you need, and then adjust it back up.
The Cutter Blades
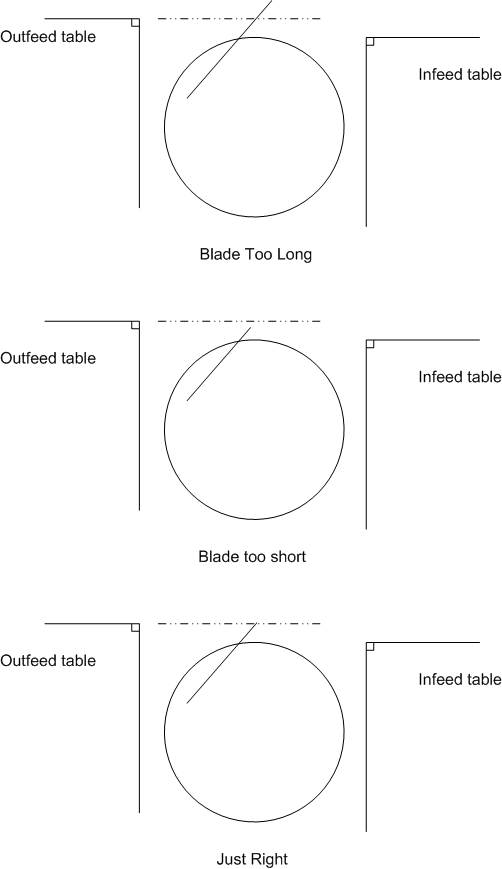
These are held in place by four allen bolts perpendicular to the blades. The are adjusted by two more allen bolts which are parallel to the blades. Here, the manual is less than helpful. What you need to do is to loosen the allen bolts holding the blade, and then adjust the blades so that they are exactly level with the outfeed table. then tighten the bolts. This is fiddly and time consuming, and will probably require a number of iterations. And each time you sharpen the blades, you need to re-adjust them.
In order to align the blades, get a straight edge and run it from the out feed table over the blades. Each blade should just touch the straight edge as you rotate it. See the diagram opposite. You may find a little bit of trial and error is required here. Patience and small adjustments is the key.
Take Good Care
There is a push stick provided. Use it. In spite of the gaurd, and through my own foolishness, my push stick already has a nice little notch in it. Had that been my fingers, typing would now be somewhat difficult.
Unfortunately about now, it started to rain, and since my "workshop" is out of doors, that necessitated a quick cover and tidy.
Next time, I'll play with the thicknessor function. I plan to thickness all the peices for a given frame in one session so that they are all done with the same machine setting.
On the whole I'm happy with the Woodstar. With a little setup work it looks like I will be able to get excellent results.
Incidently I bought this in McQuillans Tools in Blanchardstown shopping center. They don't appear to have a web site, so I can't provide a link. If anyone has a link, stick a comment in and I'll add the link here.


