Joining Plywood Sheets
Although many of our designs call for long lengths of plywood, they are becoming increasingly difficult to obtain. On our test models we use standard 4'x8' sheets, joined using one of the methods detailed below. Both methods have proven to be as strong, or stronger, than the plywood being joined.
BUTT JOINTS

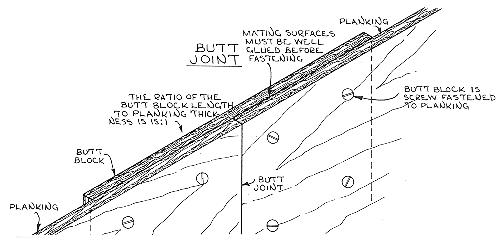
Butt joints are usually detailed in the plans, but basically consist of butting panels of plywood backed up with a butt block of the same thickness (minimum) as the plywood planking, extending 4" or more on each side of the joint. Butt joints can be glued without fasteners only if epoxy adhesives are used. Fastenings, when used, should be spaced about 2" apart and 1" from edges. When butt joining 1/4" panels with 1/4" butt blocks, screws that will not project through the opposite side have little holding power. Usually 3/4" bronze screws are used and the points projecting on the butt block side are ground flush. It is best that the screws penetrate fully, through both planking and butt block, regardless of their combined thickness. Butt joints tend to flatten the joined area, so care must be taken to join in the flattest section of the boat possible. Usual practice is to fit one planking panel to the boat, fasten in place, and then fit the butt blocks BETWEEN the longitudinals such as battens, keel, chine or sheer. Follow with the joining panel. If epoxy adhesives are used, without fasteners, it is preferable to rough cut the joining panels and pre-join them on a flat surface so proper bonding pressure can be applied, either by weights or temporary fasteners.
SCARF JOINTS

The scarf joint shown is at a ratio of 1:12 but some use a 1:10 ratio up to 1/2" and 1:8 for thicker plywood. The scarf joint length is found by multiplying the thickness of the plywood being joined by the ratio. As an example, at a 1:12 ratio, 1/4" thick plywood would have a scarf joint length of 3". Always cut the plywood panels to the minimum width as wide panels are more difficult to join. As shown in the sketch, the two plywood panels to be scarf-joined are aligned on the edge of a flat table or a sheet of 3/4" plywood. The upper panel is set back from the lower panel the distance of the scarf joint. Align the edges of the two plywood panels to be joined, the table or work surface, and the clamping block, so they are precisely parallel. Clamp, nail, or screw the block through both panels to the table or work surface. Both plywood panels are tapered simultaneously with a hand or power plane, or a disc sander for preliminary rough cutting. The panels are finished to a smooth surface with a long base joiner or smooth plane, or use extensions clamped to the side of the plane if the base is not long enough to extend from the block to the table edge and provide planing movement. Either resorcinol or epoxy adhesives can be used, although the latter is preferable for most because of its gap filling properties. Remove the panels from the fixture and give both surfaces a liberal coat of glue. (Pre-coating the mating surfaces when using epoxy products is advised). Place plastic film between the work surfaces to prevent them from being glued to the joining plywood panels and use finishing nails, driven through the scarf joint into the table, to prevent slipping. Screw or nail the blocking clamp over the joint with enough temporary fasteners to provide solid, even pressure until the glue sets. When gluing with epoxy, avoid excessive pressure that forces much of the glue out. CAUTION: Be sure the joint is left at the recommended temperature until final curing. At lower temperatures, use plastic, cardboard, or a blanket to make a hood or "tent" over the joint with an electric light as a heater, or an electric heater, to maintain the proper temperature. The holes caused by temporary fasteners can be filled with a hard-setting putty. Always use scarf joints in the flattest area of the boat and place the leading exterior edge of the scarf toward the stern.